Quick Start
We've made getting started with TestRecall as easy as possible. The rest of this page will outline important first steps to getting your first repository up and running on TestRecall.
Setup List
Here are the things you'll need or want to have in place before using TestRecall:
A project with a test suite. Test results reports being generated by your test suite in the Junit format. TestRecall ingests these reports to provide our product. [Recommended] A continuous integration provider. This will automatically run tests, generate coverage and upload that coverage to TestRecall for every run.
Basic Usage
1. Sign up on testrecall.com
You will be asked to create your organization name.
2. Create a project in TestRecall.
A project is similar to a Github project, a group for test results.
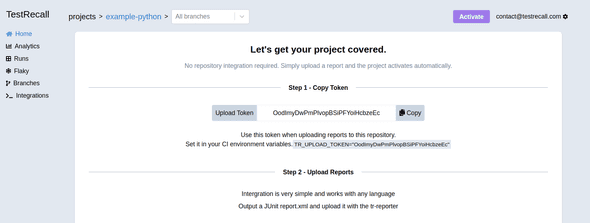
3. Generate a project TR_UPLOAD_TOKEN
This token is unique to your TestRecall project and used as a key to upload test results securely. You will need to include it in your CI in the following steps.
4. Setup your test suite
Your test suite needs to output a JUnit XML report. This is a common format implemented in most popular languages (e.g. Python, JavaScript, Ruby, Golang, Java).
If your test suite does not already output a JUnix XML report, take a look at our examples or see if your language has a package that generates this type of report for you.
Installing the testrecall reporter can be done in one line curl -sL https://get.testrecall.com/reporter | bash, making the testrecall-reporter CLI available. Running testrecall-reporter after your
test suite has completed (successfully or with a failure) will upload your test report using
the TR\_UPLOAD\_TOKEN environment variable.
There are many ways to make this command run after your test suite has finished, an easy example is to use trap in a bash script.
# test.sh
set -e
TR_UPLOAD_TOKEN="<your token>"

curl -sL https://get.testrecall.com/reporter | bash
trap 'testrecall-reporter' EXIT

# now run our test command, generating a report.xml file
npm run test
5. Run your tests
Add TestRecall to a test stage in your CI will automatically upload the test results from your project.
6. Configuration
The testrecall-reporter CLI provides configuration for custom file
locations, as well as supporting multi-report uploads when your test suite
uses multiple test runners in parallel.
This is a list of the popular options, you can find the full list on Github here.
| flag | environment | values | note |
|---|---|---|---|
-file |
<glob pattern> | file path or glob pattern for xml results, e.g. (/tmp/report.xml, or build/*/junit*.xml) |
|
-multi |
<'before' | 'multi' | 'after'> | enables multi-stage uploads, for suites that execute on multiple runners | |
TR_UPLOAD_TOKEN |
<string> | upload token for your test project |
The test reporter will pick up most configuration options by default, including common default locations for test reports.
Take a look on Github for other examples.


